1. About Xcalious ERP
A cloud-based ERP solution to centralize and automate business processes across departments.
System Overview
- Software Name: Xcalious ERP
- Deployment Model: Cloud-based (SaaS)
- Access URL: https://erp.xcalious.com
- Purpose: Improve efficiency, reduce manual work, and provide real-time insights with AI-enabled predictions.
System Requirements
- Stable internet connection
- Modern web browser (Chrome, Edge, Safari)
- Recommended screen resolution: 1366x768 or higher
Key Modules & Features
- Sales & Purchase: Quotations, Orders, Invoices, and Returns.
- Inventory & Warehouse: Order Tracking, GRN, GDN, Barcode, and Stock Reports.
- Accounting & Finance: Vouchers, Ledgers, Bank Accounts, and GST reports.
- HR: Employee records, Departments, and Roles.
- Administration: Master data for Products, Vendors, and Customers.
- Integrations: Payment Gateway, WhatsApp Business, E-Invoice, and E-Way Bill.
- AI Features: Inventory & sales predictions, dynamic discount recommendations.
- Mobile App: Order placement and delivery tracking.
2. Get Started / Onboarding
You will receive an email invitation to join Xcalious ERP. Follow these steps to get started:
-
Accept the Invitation Email
Look for an email with the subject: 'Join Xcalious Technologies' Powerful ERP System Today!'. Click the 'Accept Invitation' link inside. -
Complete Registration
After clicking the link, fill out the registration form with your company details and set a strong password. -
First Login
Navigate to https://erp.xcalious.com and log in using the email and password you just created.
3. Setup Prerequisites (Admin)
3.1 Administration & HR Setup
First, set up the organizational structure and user accounts.
- Create Departments: Navigate to Home → Administration →
Utilities → Department.
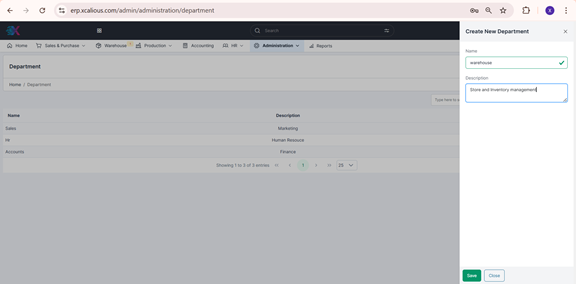
Department Creation Screen - Create User Roles: Define access control levels at Home →
Administration → Utilities → User Roles.
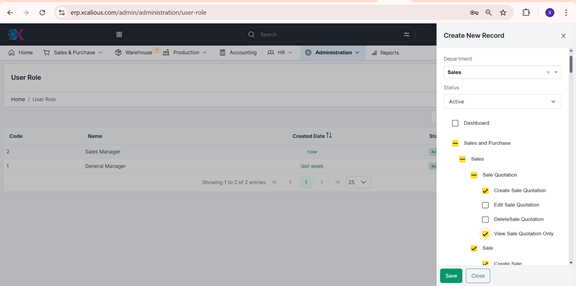
User Role (ACL) Setup - Create Employees (Users): Add users via Home → HR → Employee → Create
New. Assign roles during this step. The system
will then email login credentials to the new employee.
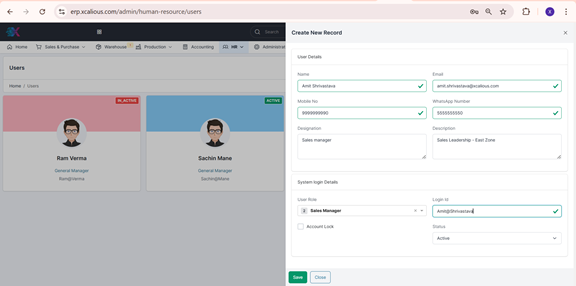
Creating a New Employee User - Bank Account Setup: Add company bank accounts at Home → Administration
→ Accounting → Bank Account. You must create at least one default
account.
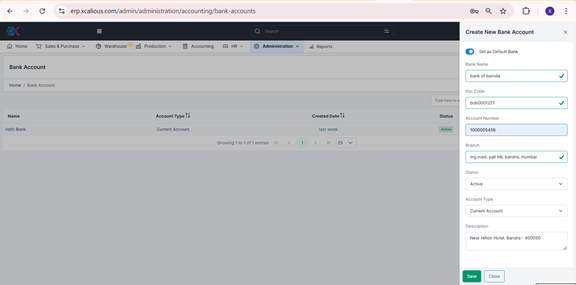
Bank Account Creation
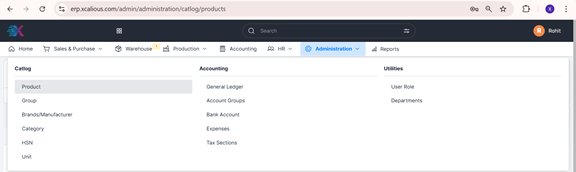
3.2 Catalog & Party Setup
Create the master data that will be used across all modules. It's recommended to follow this sequence. Bulk upload options are also available.
- Administration → Catalog → Create → Group
- Administration → Catalog → Create → Category
- Administration → Catalog → Create → Brand/Manufacturer
- Administration → Catalog → Create → HSN
- Administration → Catalog → Create → Unit
- Administration → Catalog → Create → Products
- Sales & Purchase → Vendor → Create New
- Sales & Purchase → Customer → Create New
3.3 Company Configuration
Click on your user icon in the top-right corner and select Account Settings to configure core company details.

- Company Details: Set your GST, PAN, address, and logo. [cite: 60]
- Code Generator: Define numbering rules for invoices and purchase orders.
- Print Settings: Customize templates for invoices and packing slips.
- Email & WhatsApp Settings: Configure integrations for notifications.
- Ledger Mapping: Set default posting ledgers for sales and purchases.
4. Core Module Workflows
4.1 Sales & Purchase Module
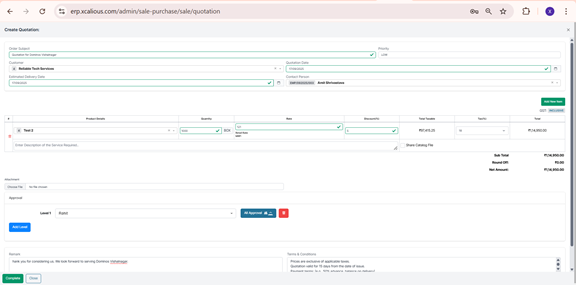
A. Create Quotation
- Path: Home → Sales & Purchase → Quotations → Create New
- Inputs: Customer, Items, Quantity, Price, Taxes. [cite: 87]
- Output: A saved quotation that can be converted to a Sales Order or Invoice.
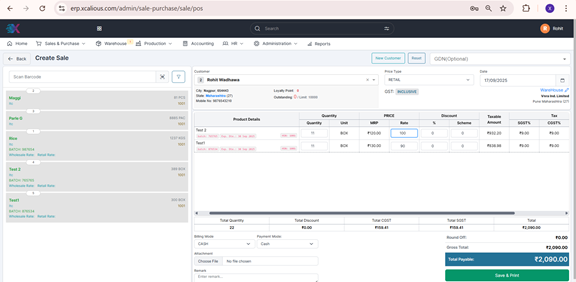
B. Create Sale (Invoice)
- Path: Home → Sales & Purchase → Sale → Create New
- Key Options: Choose Price Type (e.g., Retail/Wholesale).
- Outputs: A sales invoice is created, ledger entries are updated, and stock is reduced.
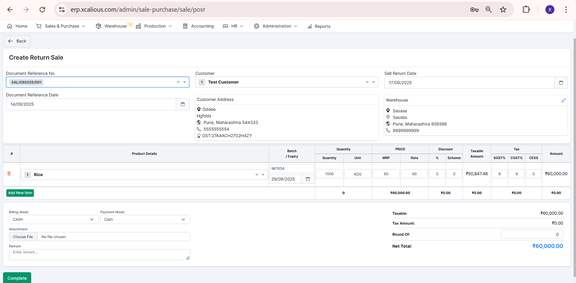
C. Sales Return (Credit Note)
- Path: Home → Sales & Purchase → Sale Return (Credit Note) → Create New
- Inputs: Reference the original invoice and specify items being returned.
- Outputs: A credit note is generated, stock levels are increased, and accounting entries are adjusted.
4.2 Inventory & Warehouse
The Operations Hub provides a complete overview of order tracking, from picking to delivery.
Material Inward & Outward (GRN & GDN)
- Goods Receipt Note (GRN): Used to record incoming materials. Can be created against a Purchase Order, as a direct receipt, or for opening balances.
- Goods Delivery Note (GDN): Used to record outgoing materials for sales orders or internal transfers.

4.3 Accounting & Finance
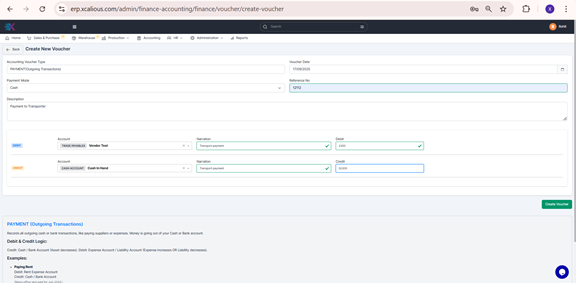
Voucher & Settlement
Record financial entries and manage outstanding balances from the Account Voucher screen.
- Path: Home → Accounting → Account Voucher → Voucher → Create New
- Voucher Types: Create Payment, Receipt, Journal, Sales, or Purchase vouchers.
- Settlements: Use the Vendor Settlement and Customer Settlement buttons to easily clear outstanding payments against invoices.
5. Reports
Access a wide range of reports from the Reports menu in the top navigation bar.
- GSTR-1 (Sales Register)
- GSTR-2 (Purchase Register)
- GSTR-3B Summary
- Vendor/Customer Outstanding Summary
- Balance Sheet Report
- HSN-wise Sales and Purchase Reports
- 12-Month Supply & Demand Analysis
- Expiry-wise Stock Report
- Inventory Performance & Profit Forecast
- Comprehensive Stock Statement
6. User Interface & Navigation
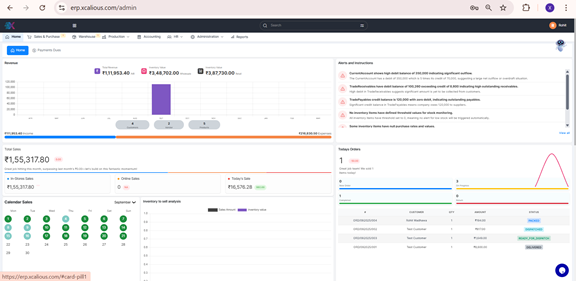
Dashboard / Home Screen
The dashboard provides a high-level overview of key business metrics, including:
- Revenue and Inventory Value
- Alerts and Instructions
- Today's Orders and Total Sales
- Inventory insights like expiring stock and low stock items
- Charts for Top 10 Products, Inventory Movement, and Turnover [cite: 196, 198, 199]
User Roles & Permissions
Roles define what a user can see and do. They are created by an administrator at Home → Administration → Utilities → User Roles and assigned to users in the HR module.
7. Data Management
- Use consistent naming conventions and product codes (SKUs).
- Enter complete GSTIN/PAN details for accurate tax calculations. [cite: 219]
- Always search for a master record (like a customer or product) before creating a new one to avoid duplicates.
- When using bulk upload, always validate a few sample records first.
Bulk import via CSV/Excel is available for Products, Customers, Vendors, Ledgers, and Opening Balances. Most lists and reports can also be exported to CSV, Excel, or PDF.
8. Administration & Configuration
Key administrator tasks include:
- User Management: Add, edit, or deactivate users from HR → Employee.
- Role Management: Define granular permissions for different user roles.
- System Settings: Configure company-wide settings from the Account Settings menu.
9. Troubleshooting & Common Errors
- Invoice not posting / ledger mapping issue
- Check the posting ledger settings under Account settings → Purchase/Sales Posting Ledger Based On. Ensure the correct ledgers exist and are mapped.
- User cannot access a specific menu
- The user's role likely does not have the required permission. An admin needs to check the user's role and active status, then update the role's permissions if necessary.
- Duplicate entry / Code already exists
- This error occurs when trying to create a record (e.g., product, invoice) with a code that already exists. Search for the existing record first or use a unique code.
Need Help?
When contacting support, please provide your company name, user email, the affected module, screenshots, and steps to reproduce the issue.
Email: Support@xcalious.com
Phone: +91-9373463314